网卡 bond 实战
Bond 的概念
网卡bond模式是一种网络绑定或链路聚合技术,它可以将多个物理网卡绑定成一个逻辑网卡,从而提高数据报文的可用性和吞吐量。从这段介绍中,我们其实看出一些使用场景,高可用性是为了解决单点故障,提高吞吐量是为了增加网络带宽。从可用性的角度看,网卡的绑定其实就是将多个网卡看作一个整体,当一张网卡挂掉或者异常之后,其他的网卡可以承载流量请求;从吞吐量的角度看,假如说有机器上有两张 100G的网卡,如果分开,就需要配置两个 ip,通信上不方便,这样我们就可以通过 bond 将其作为一个整体进行使用。
bond的作用
- 提高带宽:通过绑定多个物理网卡,可以实现网络带宽的叠加,从而提高整体网络传输速度。
- 实现冗余:当其中一个物理网卡出现故障时,其他网卡可以接管其工作,确保网络连接的连续性。
- 负载均衡:根据一定的策略将网络流量分配到不同的物理网卡上,实现负载均衡,避免单个网卡过载。
bond模式
bond 的模式一共有七种,每个模式都有各自的特点和适用场景,同时部分 bond 需要交换机的支持,以下是各种模式的概述和优缺点阐述:
| 模式编号 | 模式名称 | 概述 | 优点 | 缺点 |
|---|---|---|---|---|
| mode-0 | balance-rr (轮询负载均衡) | 在所有可用的接口上依次轮询发送数据包 | 最大化带宽利用,提供容错能力 | 可能出现包乱序问题,需交换机支持 |
| mode-1 | active-backup (主备模式) | 只有一个接口处于活动状态,其他接口作为备份 | 高可用性,简单配置 | 无负载均衡,带宽利用率低 |
| mode-2 | balance-xor (XOR 负载均衡) | 根据哈希值决定使用哪个接口,保持会话一致性 | 保持会话一致性,提供冗余 | 需要交换机支持,不适合流量集中场景 |
| mode-3 | broadcast (广播模式) | 所有数据包都会通过每个接口发送一次 | 极高冗余性 | 带宽浪费严重,适用于特殊场景 |
| mode-4 | 802.3ad (LACP) | 基于 IEEE 802.3ad 标准动态链路聚合,实现带宽聚合 | 动态带宽聚合,高性能,高冗余 | 需要交换机支持 LACP,配置复杂 |
| mode-5 | balance-tlb (传输流量负载均衡) | 根据接口负载动态调整出站流量分配 | 出站负载均衡,不需交换机支持 | 入站流量无法负载均衡,适合出站流量大的场景 |
bond的配置
配置 bond 的方式多钟多样,包括 nmcli、命令操作以及配置文件的方式,这里我们通过配置文件的方式进行操作。
在配置之前,我们需要了解到操作系统支持的 bond 参数有哪些?首先我们可以查看下内核中关于 bond 的支持情况
[root@node1 ~]# modinfo bonding
filename:       /lib/modules/4.18.0-193.28.1.el7.aarch64/kernel/drivers/net/bonding/bonding.ko.xz
author:         Thomas Davis, tadavis@lbl.gov and many others
description:    Ethernet Channel Bonding Driver, v3.7.1
version:        3.7.1
license:        GPL
alias:          rtnl-link-bond
rhelversion:    8.2
srcversion:     1E6D86D1C8403DB78D3FBDD
depends:
intree:         Y
name:           bonding
vermagic:       4.18.0-193.28.1.el7.aarch64 SMP mod_unload modversions aarch64
parm:           max_bonds:Max number of bonded devices (int)
parm:           tx_queues:Max number of transmit queues (default = 16) (int)
parm:           num_grat_arp:Number of peer notifications to send on failover event (alias of num_unsol_na) (int)
parm:           num_unsol_na:Number of peer notifications to send on failover event (alias of num_grat_arp) (int)
parm:           miimon:Link check interval in milliseconds (int)
parm:           updelay:Delay before considering link up, in milliseconds (int)
parm:           downdelay:Delay before considering link down, in milliseconds (int)
parm:           use_carrier:Use netif_carrier_ok (vs MII ioctls) in miimon; 0 for off, 1 for on (default) (int)
parm:           mode:Mode of operation; 0 for balance-rr, 1 for active-backup, 2 for balance-xor, 3 for broadcast, 4 for 802.3ad, 5 for balance-tlb, 6 for balance-alb (charp)
parm:           primary:Primary network device to use (charp)
parm:           primary_reselect:Reselect primary slave once it comes up; 0 for always (default), 1 for only if speed of primary is better, 2 for only on active slave failure (charp)
parm:           lacp_rate:LACPDU tx rate to request from 802.3ad partner; 0 for slow, 1 for fast (charp)
parm:           ad_select:802.3ad aggregation selection logic; 0 for stable (default), 1 for bandwidth, 2 for count (charp)
parm:           min_links:Minimum number of available links before turning on carrier (int)
parm:           xmit_hash_policy:balance-alb, balance-tlb, balance-xor, 802.3ad hashing method; 0 for layer 2 (default), 1 for layer 3+4, 2 for layer 2+3, 3 for encap layer 2+3, 4 for encap layer 3+4 (charp)
parm:           arp_interval:arp interval in milliseconds (int)
parm:           arp_ip_target:arp targets in n.n.n.n form (array of charp)
parm:           arp_validate:validate src/dst of ARP probes; 0 for none (default), 1 for active, 2 for backup, 3 for all (charp)
parm:           arp_all_targets:fail on any/all arp targets timeout; 0 for any (default), 1 for all (charp)
parm:           fail_over_mac:For active-backup, do not set all slaves to the same MAC; 0 for none (default), 1 for active, 2 for follow (charp)
parm:           all_slaves_active:Keep all frames received on an interface by setting active flag for all slaves; 0 for never (default), 1 for always. (int)
parm:           resend_igmp:Number of IGMP membership reports to send on link failure (int)
parm:           packets_per_slave:Packets to send per slave in balance-rr mode; 0 for a random slave, 1 packet per slave (default), >1 packets per slave. (int)
parm:           lp_interval:The number of seconds between instances where the bonding driver sends learning packets to
each slaves peer switch. The default is 1. (uint)
在配置之前,我们需要了解到操作系统支持的 bond 参数有哪些?首先我们可以查看下内核中关于 bond 的支持情况
实战配置
bond4
假设我们现在有两张网卡做 bond4,我们通过实战的形式来看一下如何做 bond:
- 假设我们有两张网卡 enp1s0f0 和 enp1s0f1,首先可以通ethtool 查看下网卡的信息,例如
[root@node1 ~]# ethtool enp1s0f0
Settings for enp1s0f0:
 Supported ports: [ FIBRE ]
 Supported link modes:   xxxx
 Supported pause frame use: Symmetric
 Supports auto-negotiation: Yes
 Supported FEC modes: None RS
 Advertised link modes:  xxxx
 Advertised pause frame use: No
 Advertised auto-negotiation: Yes
 Advertised FEC modes: RS
 Speed: 100000Mb/s
 Duplex: Full
 Port: FIBRE
 PHYAD: 0
 Transceiver: internal
 Auto-negotiation: on
 Supports Wake-on: d
 Wake-on: d
 Current message level: 0x00000004 (4)
          link
 Link detected: yes
我们可以看到这张卡的配置是 100000Mb/s,也就是一张百 G 的网卡,做bond4 就是将两张百 G 的网卡绑定在一起形成一张200G 的卡
- 不同的操作系统网卡的配置方式存在不同,我们这里以 centos7为例,进入
/etc/sysconfig/network-scripts目录下,我们可以看到网卡的配置文件名称是ifcfg-网卡名的格式。 - 创建 bond 文件
DEVICE=bond0
TYPE=bond
ONBOOT=yes
BOOTPROTO=none
USERCTL=no
BONDING_OPTS="mode=4 miimon=100 xmit_hash_policy=layer3+4"
IPADDR=192.168.11.10
NETMASK=255.255.255.0
参数释义:
DEVICE=bond0:指定这个配置是用于名为bond0的设备,bond0是逻辑绑定的接口名。TYPE=bond:表明这个设备是一个 bond 接口。ONBOOT=yes:在系统启动时自动启动这个网络接口。BOOTPROTO=none: 不使用任何启动协议(如DHCP)来获取IP地址。这意味着IP地址将静态配置。USERCTL=no:不允许非root用户控制这个网络接口。BONDING_OPTS="mode=4 miimon=100 xmit_hash_policy=layer3+4":这是绑定接口的选项,这一项支持的参数详细类型可以通过上面的modinfo bonding查看,在上述示例中,具体包含:mode=4:指定绑定模式为模式4(802.3ad 动态链路聚合)。这种模式使用LACP(链路聚合控制协议)来自动协商链路聚合。miimon=100:链路监控间隔时间,单位为毫秒。这里设置为100ms,意味着系统每100毫秒检查一次链路状态。xmit_hash_policy=layer3+4:传输哈希策略,这里设置为基于第三层(IP地址)和第四层(TCP/UDP端口号)的哈希。这有助于在多个物理接口之间均匀分布流量。
IPADDR=192.168.11.10:为这个绑定接口静态配置的IP地址。NETMASK=255.255.255.0:子网掩码
- 创建被绑定网卡文件:
[root@node1 network-scripts]# cat ifcfg-enp1s0f0
DEVICE=enp1s0f0
TYPE=Ethernet
ONBOOT=yes
BOOTPROTO=none
MASTER=bond0
SLAVE=yes
HOTPLUG=no
[root@node1 network-scripts]# cat ifcfg-enp1s0f1
DEVICE=enp1s0f1
TYPE=Ethernet
ONBOOT=yes
BOOTPROTO=none
MASTER=bond0
SLAVE=yes
HOTPLUG=no
参数释义:
DEVICE=enp1s0f1:指定这个配置是用于名为enp1s0f1的设备。enp1s0f1是物理网络接口的名称,遵循现代Linux的命名约定(基于硬件属性和位置)。TYPE=Ethernet:表明这个设备是一个以太网接口。ONBOOT=yes:在系统启动时自动启动这个网络接口。BOOTPROTO=none:不使用任何启动协议(如DHCP)来获取IP地址。这意味着这个接口将不会从DHCP服务器获取IP配置,而是可能需要静态配置(尽管作为绑定接口的从接口,它通常不会直接分配IP地址)。MASTER=bond0:指定这个接口的主接口(master interface)是bond0。这意味着enp1s0f1将作为bond0绑定接口的一个从接口。SLAVE=yes:表明这个接口是一个从接口(slave interface),它是绑定到MASTER指定的主接口上的。HOTPLUG=no:禁用热插拔功能。这通常用于确保在系统启动时或配置更改时,接口不会被自动激活或禁用,而是根据配置文件中的ONBOOT设置来管理。
- 配置完成后,重启网络:
systemctl restart network
- 检查网口
[root@node1 network-scripts]# ip a | grep -E "bond0|enp1s0f0|enp1s0f1"
6: enp1s0f0: <BROADCAST,MULTICAST,SLAVE,UP,LOWER_UP> mtu 1500 qdisc mq master bond0 state UP group default qlen 1000
7: enp1s0f1: <BROADCAST,MULTICAST,SLAVE,UP,LOWER_UP> mtu 1500 qdisc mq master bond0 state UP group default qlen 1000
9: bond0: <BROADCAST,MULTICAST,MASTER,UP,LOWER_UP> mtu 1500 qdisc noqueue state UP group default qlen 1000
    inet 192.168.11.11/24 brd 192.168.11.255 scope global noprefixroute bond0
以看到 enp1s0f0 和 enp1s0f1 网卡的状态都是 slave,都以 bond0 为 master
bond 测试
在配置完 bond0 之后,我们可以看一下 bond0 的具体情况
[root@node1 network-scripts]# ethtool bond0
Settings for bond0:
 Supported ports: [ ]
 Supported link modes:   Not reported
 Supported pause frame use: No
 Supports auto-negotiation: No
 Supported FEC modes: Not reported
 Advertised link modes:  Not reported
 Advertised pause frame use: No
 Advertised auto-negotiation: No
 Advertised FEC modes: Not reported
 Speed: 200000Mb/s
 Duplex: Full
 Port: Other
 PHYAD: 0
 Transceiver: internal
 Auto-negotiation: off
 Link detected: yes
这里的网卡速度变成了 200G,也就是聚合成功,如果显示的还是 100G,那么是有问题的,需要对配置进行检查,包括交换机侧是否已经开启支持该功能的配置。
详细的信息也可以通过以下方式查看:
[root@node1 network-scripts]# cat /proc/net/bonding/bond0
Ethernet Channel Bonding Driver: v3.7.1 (April 27, 2011)

Bonding Mode: IEEE 802.3ad Dynamic link aggregation
Transmit Hash Policy: layer3+4 (1)
MII Status: up
MII Polling Interval (ms): 100
Up Delay (ms): 0
Down Delay (ms): 0
Peer Notification Delay (ms): 0

802.3ad info
LACP rate: slow
Min links: 0
Aggregator selection policy (ad_select): stable
System priority: 65535
System MAC address: 9c:63:c0:0b:37:4e
Active Aggregator Info:
 Aggregator ID: 5
 Number of ports: 2
 Actor Key: 29
 Partner Key: 2897
 Partner Mac Address: 3c:c7:86:87:8a:21

Slave Interface: enp1s0f0
MII Status: up
Speed: 100000 Mbps
Duplex: full
Link Failure Count: 0
Permanent HW addr: 9c:63:c0:0b:37:4e
Slave queue ID: 0
Aggregator ID: 5
Actor Churn State: none
Partner Churn State: none
Actor Churned Count: 0
Partner Churned Count: 1
details actor lacp pdu:
    system priority: 65535
    system mac address: 9c:63:c0:0b:37:4e
    port key: 29
    port priority: 255
    port number: 1
    port state: 61
details partner lacp pdu:
    system priority: 32768
    system mac address: 3c:c7:86:87:8a:21
    oper key: 2897
    port priority: 32768
    port number: 1
    port state: 61

Slave Interface: enp1s0f1
MII Status: up
Speed: 100000 Mbps
Duplex: full
Link Failure Count: 0
Permanent HW addr: 9c:63:c0:0b:37:4f
Slave queue ID: 0
Aggregator ID: 5
Actor Churn State: none
Partner Churn State: none
Actor Churned Count: 1
Partner Churned Count: 1
details actor lacp pdu:
    system priority: 65535
    system mac address: 9c:63:c0:0b:37:4e
    port key: 29
    port priority: 255
    port number: 2
    port state: 61
details partner lacp pdu:
    system priority: 32768
    system mac address: 3c:c7:86:87:8a:21
    oper key: 2897
    port priority: 32768
    port number: 2
    port state: 61
性能测试
在网卡bond 做完之后,我们需要对性能进行测试,测试一下网卡的带宽是否能达到期望的要求,比较常用的测试工具有 iperf 和 netperf, 我们这里使用 iperf:
# 在服务器和客户端安装 iperf, 这里需要注意的是 iperf 有两个版本, iperf3 需要采用多服务器模式才可以打到性能要求,所以这里安装 iperf2
yum install -y iperf # 安装iperf2

# 服务器端(做 bond的服务器)启动 server
iperf -s -p 9999

# 客户端发起请求
iperf -c 192.168.11.11 -p 9999 -P 200 -t 100 # 200个线程,持续 100s
等完成后,观察测试结果:
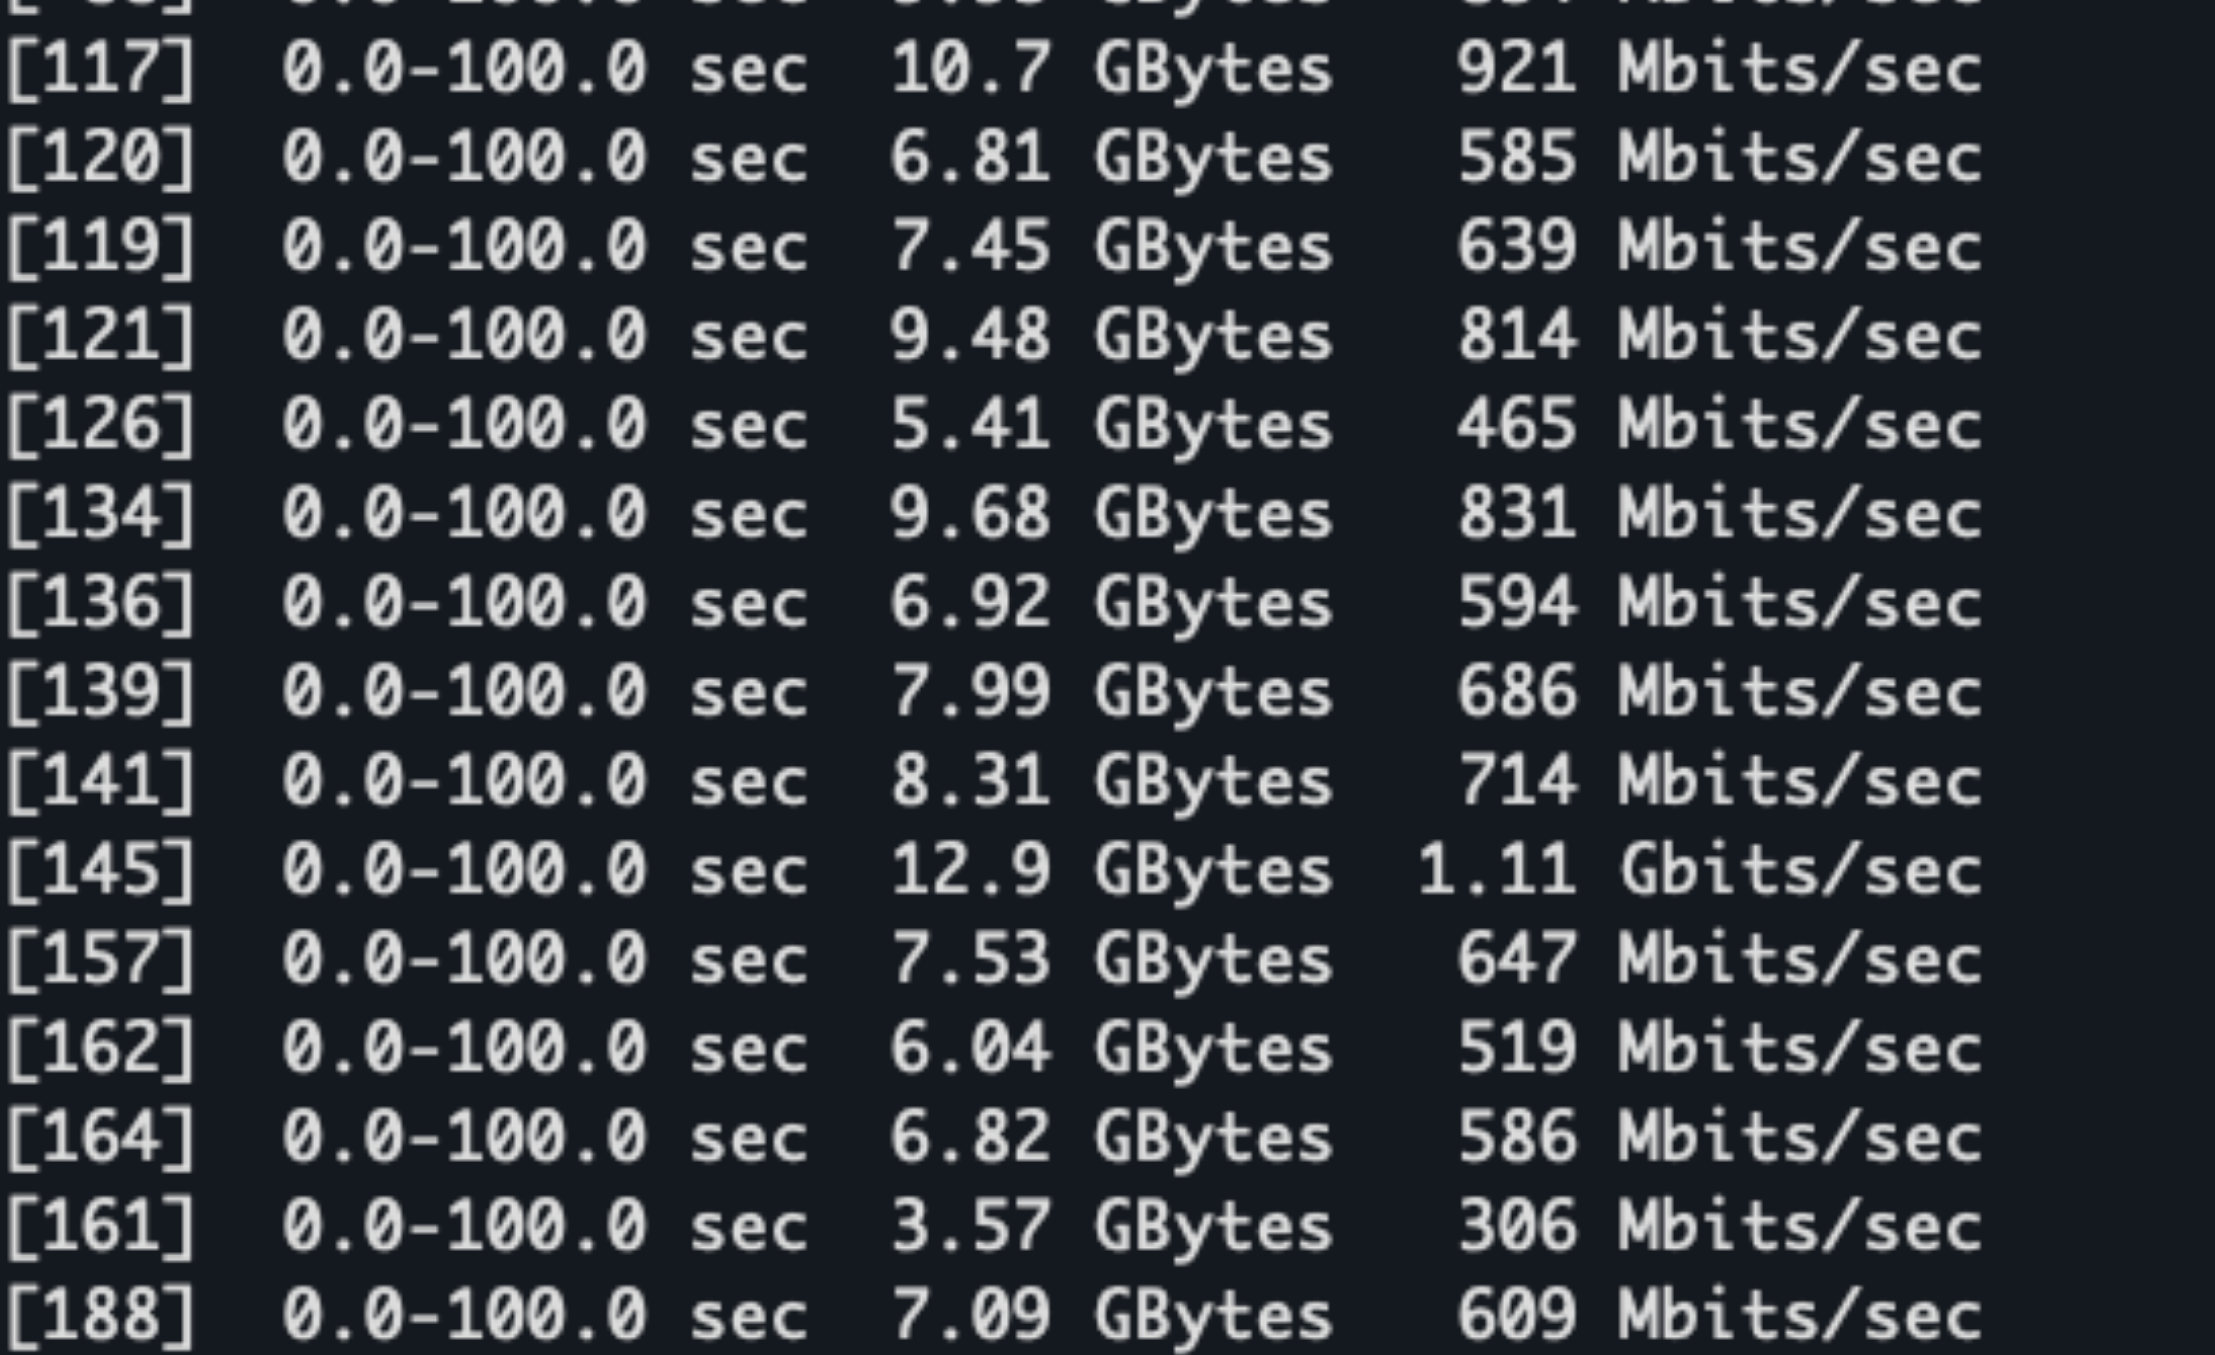
可以看到这里的网卡总带宽跑到了 197Gb/s,已经接近跑满。同时我们也可以观察下网卡的监控:
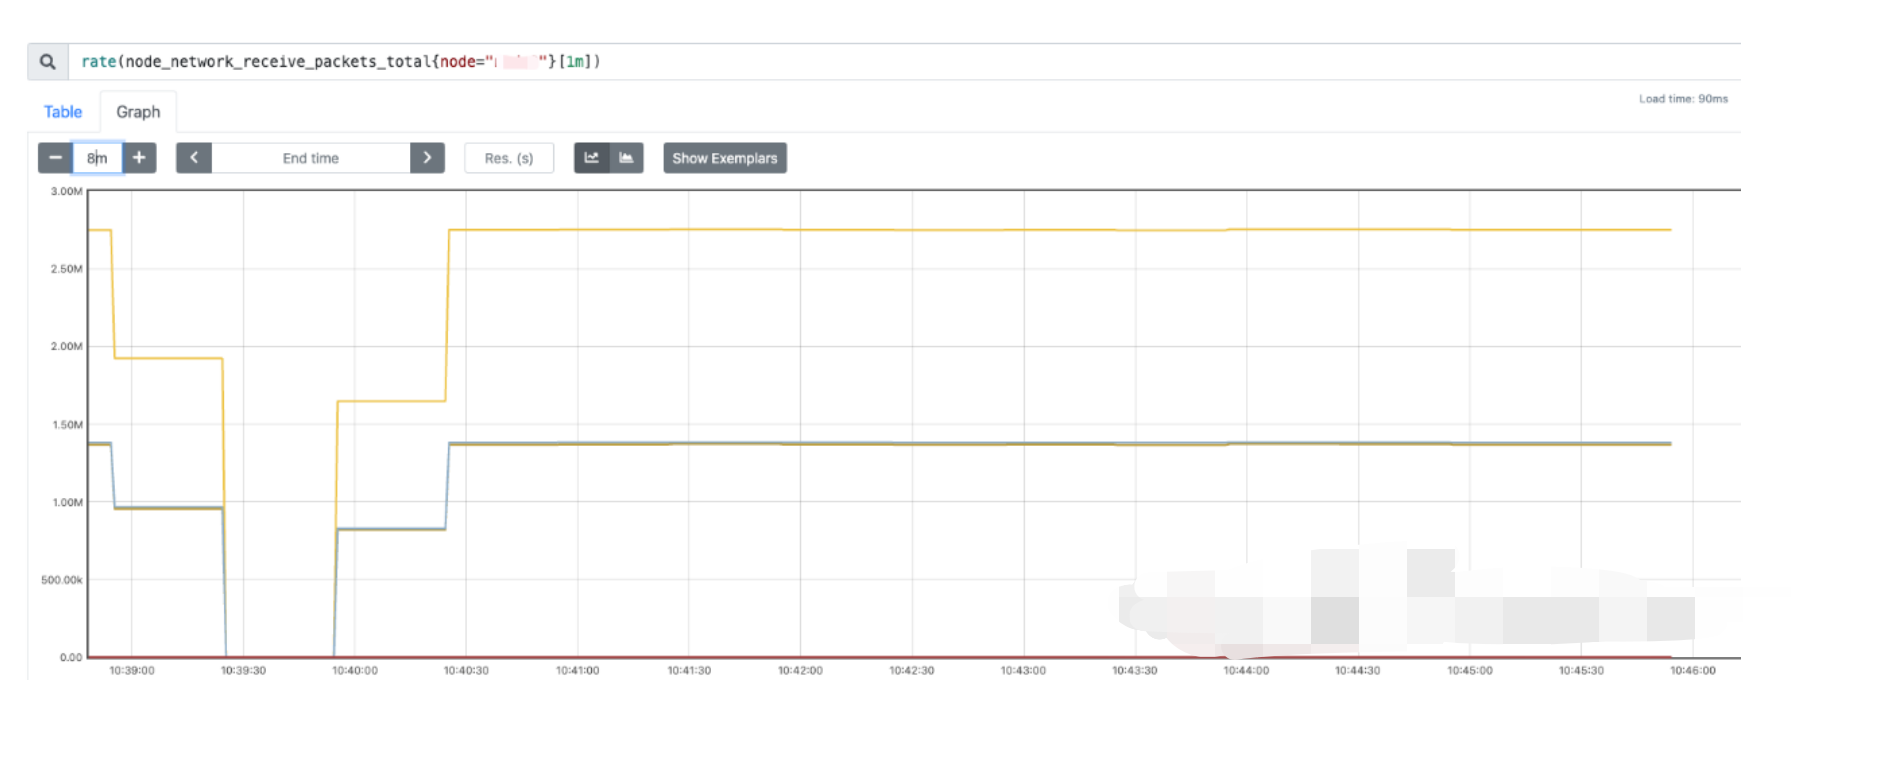 可以看到 bond 的流量均匀的打到了两个slave 网卡上。
性能调优
在网卡bond 完成之后,有的时候测试的性能可能并不理想,那么这个时候一般有以下方法进行调优,以 bond4 为例:
确保 slave 网卡均匀的接收到了流量
因为bond4 是动态聚合类型的,需要两张网卡都接收到流量,我们可以通过监控查看网卡的流量情况,以 prometheus 为例,可以通过以下指标查看:
rate(node_network_receive_packets_total{node="xxx"}[1m])
启用 Jumbo Frames
启用 Jumbo Frames 是指将网卡的最大传输单元(MTU,Maximum Transmission Unit)增大到标准以太网帧(1500 字节)以上,通常设置为 9000 字节左右。Jumbo Frames 可以显著提高传输效率,减少 CPU 开销,在需要传输大量数据的场景中(如高性能计算和数据中心网络),启用 Jumbo Frames 能提升网络性能。
优势:
- 减少数据包数量:由于每个数据包承载的数据更多,数据传输时需要的包数量会减少,进而减少网络和主机的负载。
- 降低 CPU 开销:更少的数据包意味着更少的中断请求(IRQ),降低了 CPU 的处理压力,尤其在高吞吐量网络下效果更明显。
- 提高吞吐量:在大数据传输的场景中,Jumbo Frames 可以有效增加带宽利用率。
操作步骤:
- 查看当前网卡的 mtu
[root@node1 ~]# ip a show eth0
2: eth0: <BROADCAST,MULTICAST,UP,LOWER_UP> mtu 1500 qdisc mq state UP group default qlen 1000
可以看到当前网卡的 mtu 是 1500 2. 设置 mtu 为 9000
ip link set dev <网卡名> mtu 9000
# 如果需要重启之后也保持,那么需要在配置文件中添加
MTU=9000
系统调优
- 调整 CPU 中断绑定: 如果两张网卡的中断处理都绑定在同一个 CPU 核心上,可能会导致性能瓶颈。可以使用 irqbalance 或手动调整中断的 CPU 绑定,将中断分布到多个 CPU 核心,以减少单核负载。
- 优化队列数量和大小:可以通过调整网卡的队列数量和大小,提高网卡的并行处理能力
ethtool -G enp133s0f1 rx 8192 tx 8192
调整网络栈参数:通过 /etc/sysctl.conf 文件进行 TCP 参数优化,例如增大 TCP 缓冲区,优化内核参数以支持高吞吐量:
# 增加 TCP 缓冲区大小
net.core.rmem_max = 16777216
net.core.wmem_max = 16777216
net.ipv4.tcp_rmem = 4096 87380 16777216
net.ipv4.tcp_wmem = 4096 65536 16777216
故障测试
既然是双网卡做 bond,尝试关闭其中一个网卡进行测试:
[root@node2 ~]# ifdown enp1s0f0
然后继续使用 iperf 进行测试,可以看到带宽只能跑到接近 100G

bond0 和 另外一张up 的网卡有流量并且曲线重合
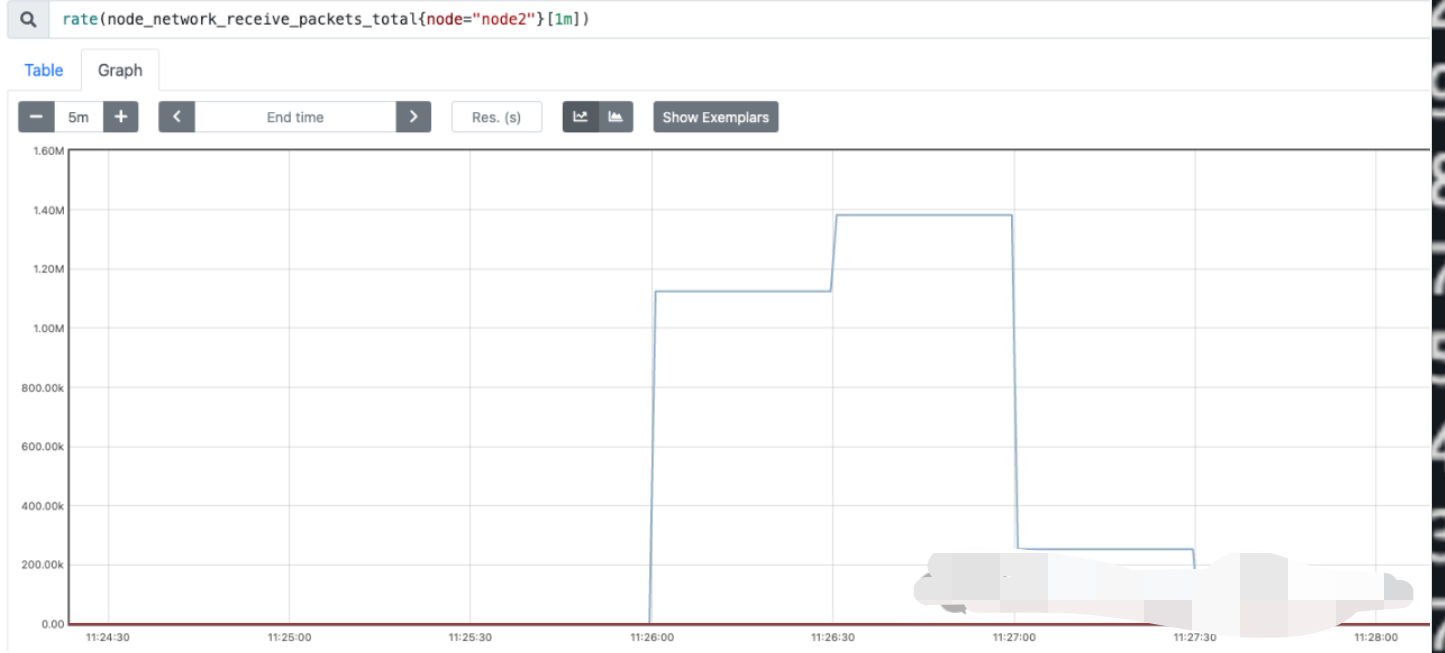
从结果来看符合预期